| 2.2. Resizing Disk Images | ||
|---|---|---|
 | Chapter 2. The Virtual Disk Cookbook |  |
| 2.2. Resizing Disk Images | ||
|---|---|---|
| | Chapter 2. The Virtual Disk Cookbook | |
In this section we'll resize two different virtual disk images. The first will be a RAW image, the other will be a QCOW2 image. The RAW section is more involved in that we'll do all of the resizing operations outside of a virtual machine. In the QCOW2 section I'll show the (simpler) steps which take place both outside and inside of a virtual machine.
In this part we'll add 2GiB to a disk image I created of a 1GiB
USB thumb drive [7] The
thumb drive has two roughly equal sized partitions, both are
EXT4.
At the end of this section we'll have done the following:
Enlarged the disk by 2GiB with qemu-img
Shifted the the second partition 1024MiB right into the new space with gparted
Enlarged the first partition by about 1GiB with gparted
Resized the first filesystem to use the new space on its partition with resize2fs
Example 2.2.
Resize a RAW Image
# qemu-img info thumb_drive_resize.raw
image: thumb_drive_resize.raw
file format: raw
virtual size: 966M (1012924416 bytes)
disk size: 914M

# qemu-img resize thumb_drive_resize.raw +2G
Image resized.

# qemu-img info thumb_drive_resize.raw
image: thumb_drive_resize.raw
file format: raw
virtual size: 2.9G (3160408064 bytes)
disk size: 914M
Next we need to create device maps and devices linking to the
enlarged disk image so we may interact with it. We will use the
kpartx command
[8]
to automatically create loop devices
[9]
[10]
and device maps to the partitions. The -a
option means we're adding partition mappings and the
-v option means to do it with increased
verbosity so we know the names of the created devices.
Example 2.3. Create devices with kpartx
# kpartx -av ./thumb_drive_resize.raw
add map loop0p1 (253:8): 0 3082432 linear /dev/loop0 2048
add map loop0p2 (253:9): 0 996030 linear /dev/loop0 3084480

# dmsetup ls | grep loop
loop0p2 (253:9)
loop0p1 (253:8)
Now we're going to use gparted to resize the partitions in the disk image. There are two important things to keep in mind:
gparted expects to find the loop0p* devices in /dev/, not in /dev/mapper/
gparted won't list loop devices in its device selection menu
When we ran kpartx it created symbolic links
to the new devices
(/dev/dm-*) which map to
the partitions on /dev/loop0. We can use this
information to create the symlinks necessary for
gparted to locate loop0p*.
Example 2.4. Create the symbolic links
# ls -l /dev/mapper/loop0p*
lrwxrwxrwx 1 root root 7 Jan 21 15:07 /dev/mapper/loop0p1 -> ../dm-8
lrwxrwxrwx 1 root root 7 Jan 21 15:07 /dev/mapper/loop0p2 -> ../dm-9

# ln -s /dev/dm-8 /dev/loop0p1
# ln -s /dev/dm-9 /dev/loop0p2

# ls -l /dev/loop0p[12]
lrwxrwxrwx 1 root root 9 Jan 21 15:23 /dev/loop0p1 -> /dev/dm-8
lrwxrwxrwx 1 root root 9 Jan 21 15:23 /dev/loop0p2 -> /dev/dm-9
Once the symlinks are created we can run
gparted from the command line with /dev/loop0 as the device argument.
Example 2.5. Run gparted
# gparted /dev/loop0
======================
libparted : 3.0
======================
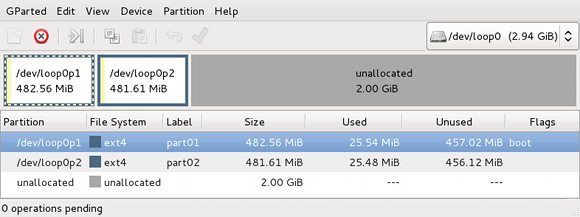
Now gparted should open and show the two existing partitions, as well as the 2GiB of unallocated space we just added to the image:
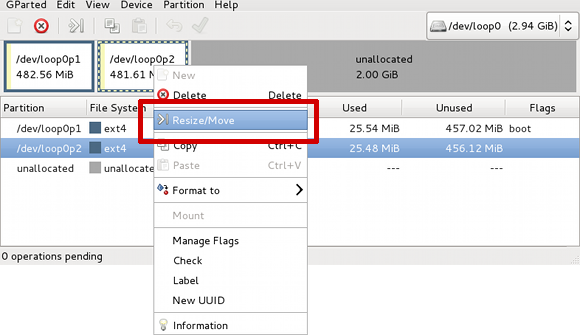
Right click the second partition, loop0p2, and select the
Resize/Move option:
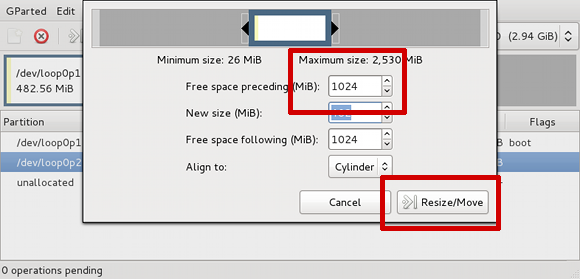
We're not going to resize the second partition. We just want to
make room for the first partition to expand into. Enter
1024 into the Free space preceding
(MiB) box. That will move this partition to the right
far enough to leave the first partition enough room to expand to
1024 MiB. Also, in the Align to drop-down
menu select Cylinder
[11]
:
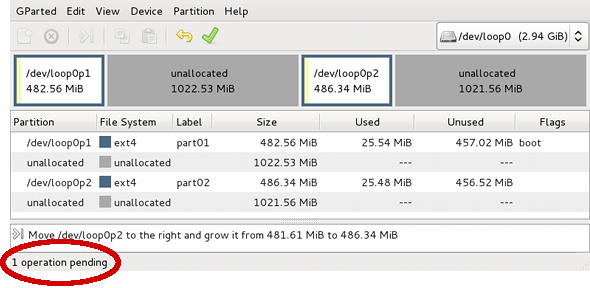
gparted will now show 1 operation pending:
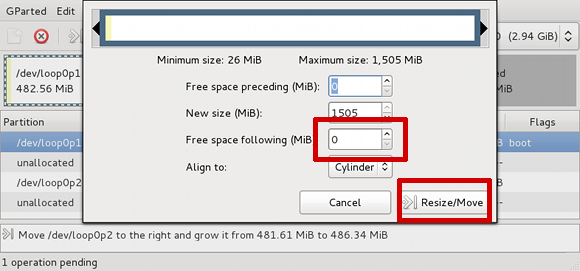
Now right click the first partition and select
Resize/Move like we did with the second
partition. We'll make the first partition use the free space
preceding the second partition by setting the Free space
following (MiB) input box to
0. Again, in the Align to
drop-down menu select Cylinder:
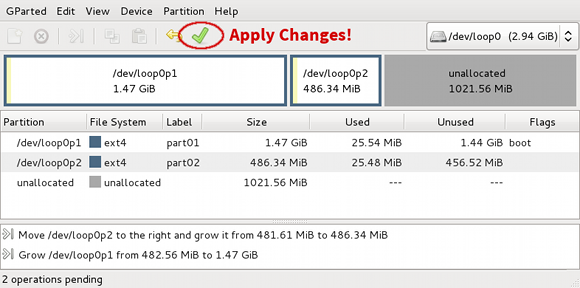
There is a summary of the two pending actions below the partition table. Click the green check mark button to apply the changes:
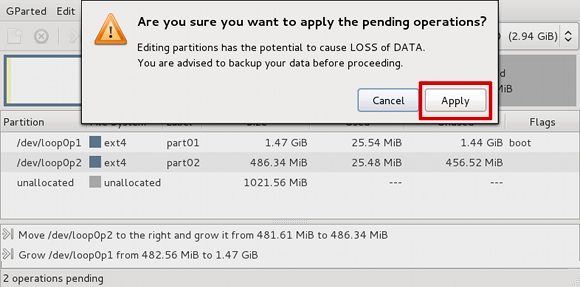
After you click apply you'll get this confirmation dialog:
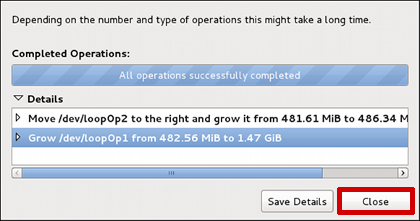
Once you click apply again this window will show the progress:
You should see this screen if there were no errors:
TODO: What if there ARE errors?
All done! Click Close to return to the main gparted screen:
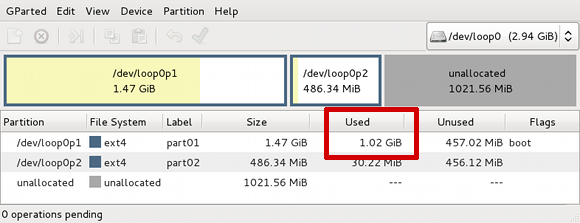
But wait, what's this on the last screen here?
gparted says loop0p1 is using 1.02GiB of
1.47GiB. That can't be right. Before resizing the partition
gparted said loop0p1 was only using 25.54MiB out
of 482.56MiB. Let's take a look at it on the command line:
Example 2.6. Compare gparted and df output
# mount /dev/loop0p1 /mnt/vdg01

# df -h /mnt/vdg01
Filesystem           Size  Used Avail Use% Mounted on
/dev/mapper/loop0p1  468M   11M  433M   3% /mnt/vdg01

# du -sh /mnt/vdg01
14K     /mnt/vdg01

# umount -l /mnt/vdg01
All of that is incorrect too, as if nothing we did in gparted had an effect. What's going on here?
After the partitions were resized the partition table was
updated with the new information but we never updated the device
maps in the kernel. The kpartx command also
accepts a -u option to
update partitions mappings. Let's try that
and see if it fixes our problem:
This step may not be actually necessary
Example 2.7. Create device maps with kpartx
# kpartx -uv /dev/loop0
add map loop0p1 (253:8): 0 3082432 linear /dev/loop0 2048
add map loop0p2 (253:9): 0 996030 linear /dev/loop0 3084480
TODO: Need a table here for comparison? (commented example in source)
The partition sizes and offsets reflect the changes we made, but mounting the first partition still doesn't show the added capacity:
Example 2.8. Still missing added capacity
# mount /dev/loop0p1 /mnt/vdg01

# df -h /mnt/vdg01
Filesystem           Size  Used Avail Use% Mounted on
/dev/mapper/loop0p1  468M   11M  433M   3% /mnt/vdg01
We've already resized the partition, but we haven't resized the
filesystem on the partition. That's the last
thing we have to do to finish this whole resizing operation. We'll
use the resize2fs command and let it
automatically resize the filesystem to fill the available space on
the /dev/loop0p1 partition.
Example 2.9. Resize the filesystem with resize2fs
# resize2fs /dev/loop0p1
resize2fs 1.42.3 (14-May-2012)
Resizing the filesystem on /dev/loop0p1 to 1541216 (1k) blocks.
The filesystem on /dev/loop0p1 is now 1541216 blocks long.

# mount /dev/loop0p1 /mnt/vdg01

# df -h /mnt/vdg01
Filesystem           Size  Used Avail Use% Mounted on
/dev/mapper/loop0p1  1.5G   11M  1.4G   1% /mnt/vdg01
Don't forget to clean up those lingering symlinks we made earlier:
![[Note]](images/note.png) | Note |
|---|---|
The resize2fs command can also shrink partitions, print the minimum possible size, and a couple other things. Check man 8 resize2fs for more information. |
In this section we'll resize a QCOW2 image, making it 5GB larger. This process will differ from the RAW image resizing section in that we'll do some operations outside of the virtual machine and some operations inside of the virtual machine.
TODO: Link to VDG-Cookbook-Resize-Image-RAW
The virtual machine we'll be working with is called
f18, which is running Fedora Linux and has no LVM managed
partitions. The disk image for this virtual machine is located
at /var/lib/libvirt/images/f18.qcow2,
and the root partition is vda3.
Outside of the virtual machine the disk looks like this:
Example 2.11. Examine f18.qcow2 on the host
# qemu-img info f18.qcow2
image: f18.qcow2
file format: qcow2
virtual size: 12G (12884901888 bytes)
disk size: 4.7G
cluster_size: 65536
Inside of the virtual machine the disk and root partition look like this:
Example 2.12. Examine vda in the guest
# parted /dev/vda print
Model: Virtio Block Device (virtblk)
Disk /dev/vda: 12.9GB
Sector size (logical/physical): 512B/512B
Partition Table: msdos
Disk Flags:

Number  Start   End     Size    Type     File system     Flags
 1      1049kB  525MB   524MB   primary  ext4            boot
 2      525MB   4686MB  4161MB  primary  linux-swap(v1)
 3      4686MB  12.9GB  8199MB  primary  ext4

# df -h /
Filesystem      Size  Used Avail Use% Mounted on
/dev/vda3       7.6G  3.8G  3.4G  53% /
![[Warning]](images/warning.png) | Warning |
|---|---|
Before we begin: make sure you shutdown any virtual machines
the disk might be attached to! For example:
|
TODO: Link to section which handles resizing LVM managed partitions
Once the virtual machine is shutdown the process for resizing
QCOW2 images starts similar to the process for resizing RAW
images. Use the qemu-img
resize sub-command, specify the disk to
operate on (f18.qcow2), and how much to
increase the size by (+5G):
Example 2.13.
Resize a QCOW2 Image
# qemu-img resize f18.qcow2 +5G
Image resized.

# qemu-img info f18.qcow2
image: f18.qcow2
file format: qcow2
virtual size: 17G (18253611008 bytes)
disk size: 4.7G
cluster_size: 65536
Once you've resized the disk image you can turn the virtual
machine back on, for example: virsh start
f18
![[Important]](images/important.png) | Important |
|---|---|
The following steps happen inside of the running virtual machine. |
Once the machine is back online we can resize the partition with the fdisk command. Technical note here: when we “resize” the partition with fdisk what we're actually doing is deleting the partition and then re-creating it starting at the same position [12] .
Example 2.14.
Resize /dev/vda with
parted
# fdisk /dev/vda
Command (m for help): p

Disk /dev/vda: 18.3 GB, 18253611008 bytes, 35651584 sectors
Units = cylinders of 1008 * 512 = 516096 bytes
Sector size (logical/physical): 512 bytes / 512 bytes
I/O size (minimum/optimal): 512 bytes / 512 bytes
Disk identifier: 0x00020891

   Device Boot      Start         End      Blocks   Id  System
/dev/vda1   *           3        1018      512000   83  Linux
/dev/vda2            1018        9080     4063232   82  Linux swap / Solaris
/dev/vda3            9080       24967     8006656   83  Linux

Command (m for help): d
Partition number (1-4): 3
Partition 3 is deleted

Command (m for help): n
Partition type:
   p   primary (2 primary, 0 extended, 2 free)
   e   extended
Select (default p): p
Partition number (1-4, default 3): 3
First cylinder (9080-35368, default 9080):
Using default value 9080
Last cylinder, +cylinders or +size{K,M,G} (9080-35368, default 35368):
Using default value 35368
Partition 3 of type Linux and of size 12.7 GiB is set

Command (m for help): w
The partition table has been altered!

Calling ioctl() to re-read partition table.

WARNING: Re-reading the partition table failed with error 16: Device or resource busy.
The kernel still uses the old table. The new table will be used at
the next reboot or after you run partprobe(8) or kpartx(8)
Syncing disks. | Note |
|---|---|
In the above example we use the defaults for some of the new partition creation prompts. The defaults work out to selecting the first and last available cylinders, respectively. |
Restart the virtual machine again. Now we can see the partition size has increased from 7.6G to 13.6GB:
Example 2.15. New capacity now detected
# parted /dev/vda print
Model: Virtio Block Device (virtblk)
Disk /dev/vda: 18.3GB
Sector size (logical/physical): 512B/512B
Partition Table: msdos
Disk Flags:

Number  Start   End     Size    Type     File system     Flags
 1      1049kB  525MB   524MB   primary  ext4            boot
 2      525MB   4686MB  4161MB  primary  linux-swap(v1)
 3      4686MB  18.3GB  13.6GB  primary  ext4
Just like when we resized the filesystem on the RAW disk image
we'll use the resize2fs command inside the
QCOW2 image. The root partition, /dev/vda3, is the last partition on the
disk and is followed by free space which we'll grow it into:
Example 2.16.
Grow the filesystem on /dev/vda3
# resize2fs /dev/vda3
resize2fs 1.42.5 (29-Jul-2012)
Filesystem at /dev/vda3 is mounted on /; on-line resizing required
old_desc_blocks = 1, new_desc_blocks = 1
The filesystem on /dev/vda3 is now 3312304 blocks long.

# df -h /
Filesystem      Size  Used Avail Use% Mounted on
/dev/vda3        13G  3.6G  8.3G  31% /
[7] See Section 2.7, “Cloning a Physical Disk” for instructions on how to do this yourself.
[8] For more information on the kpartx command, see Chapter 4, Helper Utilities
[9] Don't confuse the often misused term
loopback device with a loop
device. In networking a loopback device refers to a
virtual interface used for routing within a host. localhost is the standard
hostname given to the loopback address 127.0.0.1. See rfc1700
Assigned Numbers for additional
information (http://tools.ietf.org/html/rfc1700).
[10] We'll revisit loop devices in Chapter 3, Disk Concepts
[11] On aligning Partitions: Section B.3, “The Master Boot Record”
[12] While performing research for this section, I found some examples where the parted resize sub-command was used. As of parted version 2.4 the resize subcommand no longer exists.
| |  | |
| Chapter 2. The Virtual Disk Cookbook |  | 2.3. Query an Image for Information |